Overvew
Relaying a bitcoin transaction might sometimes be tricky if you're stuck behind a firewall or caught up in some scenarios where a captive portal prevents access via a free wifi hotspot provider. In some cases, these scenarios might still provide access to DNS without any limitation. In this tutorial, we will demonstrate a mechanism through which you can access a bitcoin node over a DNS tunnel.
Prerequisites
You will need access to a bitcoin node. We suggest executing against a node configured in regtest mode so that we can have the freedom of playing with various scenarios without having to loose real money. You can however execute these against either the testnet or mainnet configurations.
Note:
If you don't currently have access to a bitcoin development environment set up, dont' worry, we have your back! We've setup a web based mechanism which provisions your very own private session that includes these tools and comes preconfigured with a bitcoin node inregtestmode. https://bitcoindev.network/bitcoin-cli-sandbox/
Alternatively, we have also provided a simple docker container configured inregtestmode that you can install for testing purposes.gr0kchain:~ $ docker volume create --name=bitcoind-data gr0kchain:~ $ docker run -v bitcoind-data:/bitcoin --name=bitcoind-node -d \ -p 18444:18444 \ -p 127.0.0.1:18332:18332 \ bitcoindevelopernetwork/bitcoind-regtest
You can also check for available nodes by following the details of our Bitcoin network statistics tutorial.
In addition to this, we will need a remote server that we will be using to configure a DNS tunnelling daemon.
A quick primer on DNS
To understand how we'll use DNS to tunnel data, we'll need a little bit of background on how the domain name system (DNS) works. DNS in its simplest form is an internet standard for translating names to numbers, kind of like directory. The goal of domain names is to provide a mechanism for naming resources in such a way that the names are usable in different hosts, networks, protocol families, internets, and administrative organisations.
It consists of various kinds of record types such as lookups for names to numbers which are called A (Host address) name records, or lookups for names to other names including Canonical name records (CNAME), or even mail MX (Mail eXchange) records. We can see this in action by doing the following lookup.
gr0kchain@bitcoindev $ dig bitcoindev.network

; <<>> DiG 9.10.6 <<>> bitcoindev.network
;; global options: +cmd
;; Got answer:
;; ->>HEADER<<- opcode: QUERY, status: NOERROR, id: 19950
;; flags: qr rd ra; QUERY: 1, ANSWER: 2, AUTHORITY: 0, ADDITIONAL: 0

;; QUESTION SECTION:
;bitcoindev.network.		IN	A

;; ANSWER SECTION:
bitcoindev.network.	101	IN	A	104.18.46.61
bitcoindev.network.	101	IN	A	104.18.47.61

;; Query time: 11 msec
;; SERVER: 192.168.88.254#53(192.168.88.254)
;; WHEN: Mon Mar 18 23:36:01 SAST 2019
;; MSG SIZE  rcvd: 68
Here we can see the name bitcoindev.network resolves to an A name record which points to the address 104.18.46.61. This mechanism is used by various internet applications behind the scenes so that you don't have to remember the IP addresses off by heart.
There is however another interesting record which comes in useful for the purposes of our requirements, and that is defined in the RFC1035 specifivation called the TXT record.
3.3.14. TXT RDATA format

    +--+--+--+--+--+--+--+--+--+--+--+--+--+--+--+--+
    /                   TXT-DATA                    /
    +--+--+--+--+--+--+--+--+--+--+--+--+--+--+--+--+

where:

TXT-DATA        One or more <character-string>s.

TXT RRs are used to hold descriptive text.  The semantics of the text
depends on the domain where it is found.
As indicated by the specification, the TXT data record can be used to store arbitrary text data. We can see this in action by issuing a TXT record query against the DNS servers for the tutorial.bitcoindev.network domain as follows.
gr0kchain@bitcoindev $ dig -t txt tutorial.bitcoindev.network

; <<>> DiG 9.10.6 <<>> -t txt tutorial.bitcoindev.network @noah.ns.cloudflare.com
;; global options: +cmd
;; Got answer:
;; ->>HEADER<<- opcode: QUERY, status: NOERROR, id: 61251
;; flags: qr aa rd; QUERY: 1, ANSWER: 1, AUTHORITY: 0, ADDITIONAL: 1
;; WARNING: recursion requested but not available

;; OPT PSEUDOSECTION:
; EDNS: version: 0, flags:; udp: 512
;; QUESTION SECTION:
;tutorial.bitcoindev.network.	IN	TXT

;; ANSWER SECTION:
tutorial.bitcoindev.network. 300 IN	TXT	"Hi there bitcoin developer!"

;; Query time: 11 msec
;; SERVER: 173.245.59.133#53(173.245.59.133)
;; WHEN: Mon Mar 18 23:45:33 SAST 2019
;; MSG SIZE  rcvd: 96
Here we can see a TXT record for the domain tutorial.bitcoindev.network having the value of "Hi there bitcoin developer!". The character limit of this record prevents us from marshaling large blobs of text, but can be used to chunk data and create a communication channel through exploiting this record type.
Setting up our DNS tunneling server
Dns2tcp is a tool for relaying TCP connections over DNS. There is only a simple identification mechanism but no encryption. DNS encapsulation must be considered as an insecure and anonymous transport layer. Resources should be public external services like ssh, ssltunnel or in our case bitcoin! It consists of two components including a server (dns2tcpd) and a client (dns2tcpd).
Note
There are various tools available for achieving this including iodine dnscat2 to name just a few. Here we are using dns2tcp as this was the simplest and most effecient way of demonstrating this.
The following needs to be performed on a server which is not behind the firewall or captive portal network.
- Install dns2tcp.
gr0kchain@bitcoindev $ aptitude install dns2tcp
- Configure dns2tcp.
root@ubuntu-512mb-ams2-01:~# cat /etc/dns2tcpd.conf
listen = 0.0.0.0
port = 53
# If you change this value, also change the USER variable in /etc/default/dns2tcpd
user = nobody
chroot = /tmp
domain = dns2tcp.bitcoindev.network
key = satoshi
resources = ssh:127.0.0.1:22 , smtp:127.0.0.1:25, bitcoin:52.191.254.47:8333
Note
We are configuring the listen parameter here to listen on all interfaces so that we can access this server externally. An important section here is for our bitcoin channel, which has been configured to connect to a bitcoin node on port8333. You will need to update this based on your own requirements.
- Start dns2tcp.
gr0kchain@bitcoindev $ nohup dns2tcpd -F -d1 -f /etc/dns2tcpd.conf &
- We can confirm that this is up and running.
root@ubuntu-512mb-ams2-01:~# netstat -lnp | grep dns2tcp
udp        0      0 0.0.0.0:53              0.0.0.0:*                           9663/dns2tcpd
We should now have a dns2tcp daemon running on our remote server.
Setting up our dns2tcp client
Next, we need to install a copy of tcp2dns on our client machine.
- . Install dns2tcp.
gr0kchain@bitcoindev $ aptitude install dns2tcp
- Discover the remote server connection types.
gr0kchain@bitcoindev $ dns2tcpc -z dns2tcp.bitcoindev.network -k satoshi 198.211.119.30
Available connection(s) :
	ssh
	smtp
	bitcoin

Note : Compression SEEMS available !
Great! we can see the three services we have configured.
- Create a local configuration file with the details for connecting to our server.
gr0kchain@bitcoindev $ cat ~/.dns2tcpc
domain = dns2tcp.bitcoindev.network
resource = bitcoin
local_port = 8332
debug_level = 1
key = satoshi
server = 198.211.119.30
Note
The details for yourdomainandkeyneed to match that of those configured on our server. The server ip here is the ip of the remote server currently runningdns2tcpd.
- Start the dns2tcpc client.
gr0kchain@bitcoindev $ dns2tcpc -f ~/.dns2tcpc
debug level 1
Listening on port : 8333
- Next we can test if this connection is working.
gr0kchain@bitcoindev $ echo -en "f9beb4d976657273696f6e000000000064000000358d493262ea0000010000000000000011b2d05000000000010000000000000000000000000000000000ffff000000000000000000000000000000000000000000000000ffff0000000000003b2eb35d8ce617650f2f5361746f7368693a302e372e322fc03e0300" | xxd -r -p | nc localhost 8333 -i 2 | xxd
00000000: f9be b4d9 7665 7273 696f 6e00 0000 0000  ....version.....
00000010: 7600 0000 02b0 4fd2 7f11 0100 0d04 0000  v.....O.........
00000020: 0000 0000 3a19 905c 0000 0000 0000 0000  ....:..\........
00000030: 0000 0000 0000 0000 0000 0000 0000 ffff  ................
00000040: c6d3 771e 8ae4 0d04 0000 0000 0000 0000  ..w.............
00000050: 0000 0000 0000 0000 0000 0000 0000 0000  ................
00000060: 5095 86f5 9ec4 cc17 202f 5361 746f 7368  P....... /Satosh
00000070: 693a 302e 3137 2e30 2e31 284c 6971 7561  i:0.17.0.1(Liqua
00000080: 6c69 7479 2e69 6f29 2f9d a908 0001 f9be  lity.io)/.......
00000090: b4d9 7665 7261 636b 0000 0000 0000 0000  ..verack........
000000a0: 0000 5df6 e0e2 f9be b4d9 616c 6572 7400  ..].......alert.
000000b0: 0000 0000 0000 a800 0000 1bf9 aaea 6001  ..............`.
000000c0: 0000 0000 0000 0000 0000 00ff ffff 7f00  ................
000000d0: 0000 00ff ffff 7ffe ffff 7f01 ffff ff7f  ................
000000e0: 0000 0000 ffff ff7f 00ff ffff 7f00 2f55  ............../U
000000f0: 5247 454e 543a 2041 6c65 7274 206b 6579  RGENT: Alert key
00000100: 2063 6f6d 7072 6f6d 6973 6564 2c20 7570   compromised, up
00000110: 6772 6164 6520 7265 7175 6972 6564 0046  grade required.F
00000120: 3044 0220 653f ebd6 410f 470f 6bae 11ca  0D. e?..A.G.k...
00000130: d19c 4841 3bec b1ac 2c17 f908 fd0f d53b  ..HA;...,......;
00000140: dc3a bd52 0220 6d0e 9c96 fe88 d4a0 f01e  .:.R. m.........
00000150: d9de dae2 b6f9 e00d a94c ad0f ecaa e66e  .........L.....n
00000160: cf68 9bf7 1b50                           .h...P
Well done, we should be recieving a resposne from our server.
Note
Here we simply pass a raw bitcoin wire protocol version message to the local port8333that has been exposed via dns2tcp. For more information on the approach used in this step, please see the Bitcoin wire protocol 101. Tutorial.
Further information
You could also make use of the ssh channel by creating a socks proxy.
gr0kchain@bitcoindev $ dns2tcpc -rssh -l 8080 -z dns2tcp.bitcoindev.network -k satoshi 198.211.119.30
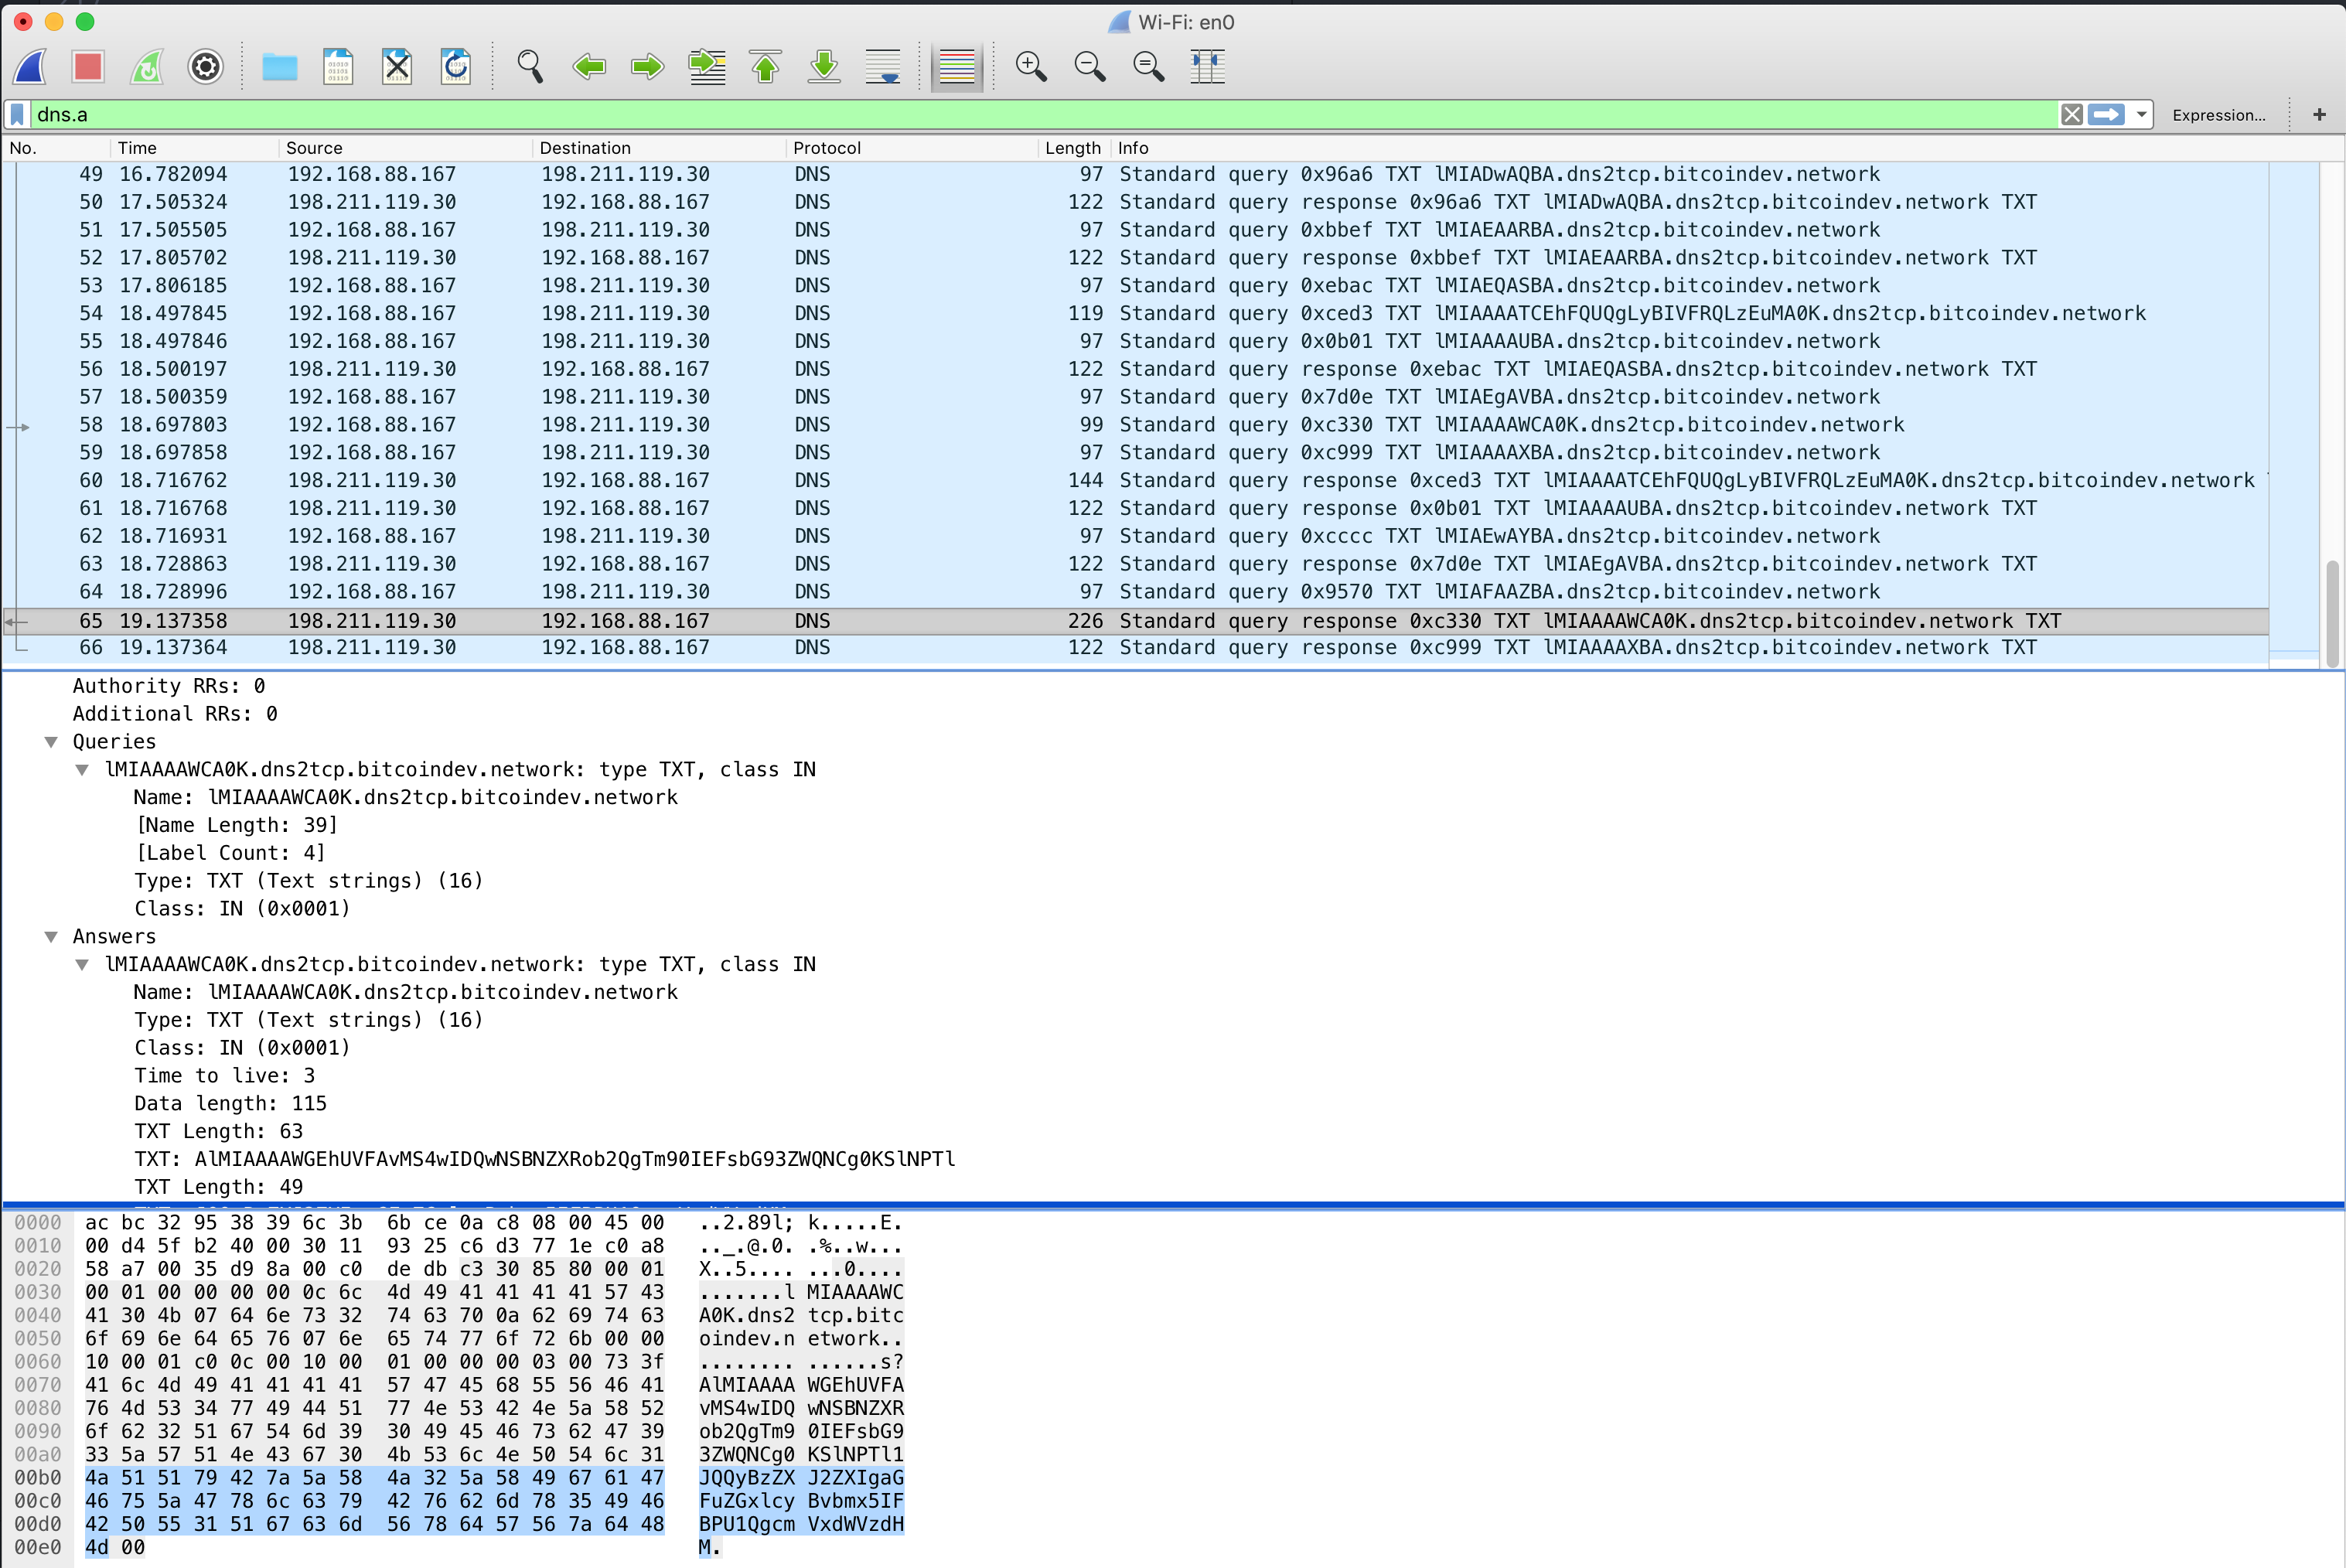
We can also inspect the aforementioned DNS packetsby using a protocol analyser like wireshark or tcpdump. Here is an example using the command line version of wireshark called tshark.
gr0kchain@bitcoindev $ tshark -i en0 -f "udp port 53" -Y "dns.qry.type == 16 and dns.flags.response == 0"
Capturing on 'Wi-Fi'
    1   0.000000 192.168.88.167 → 198.211.119.30 DNS 103 Standard query 0xfaee TXT AAAAADsgAA.=auth.dns2tcp.bitcoindev.network
    3   0.164826 192.168.88.167 → 198.211.119.30 DNS 156 Standard query 0xcce3 TXT i9OFgAABAEVBQzFFNzk3MzQ2OTdCQ0JFQTA0NDJDNzY4RDFCRDY2M0QyOUVCMkQ.=auth.dns2tcp.bitcoindev.network
    5   0.320708 192.168.88.167 → 198.211.119.30 DNS 115 Standard query 0x0e78 TXT i9ORI0jMAGJpdGNvaW4.=connect.dns2tcp.bitcoindev.network
    7   0.657419 192.168.88.167 → 198.211.119.30 DNS 97 Standard query 0x4c0a TXT i9MAAAABBA.dns2tcp.bitcoindev.network
    9   1.153287 192.168.88.167 → 198.211.119.30 DNS 97 Standard query 0x11b4 TXT i9MAAQACBA.dns2tcp.bitcoindev.network
   11   1.865711 192.168.88.167 → 198.211.119.30 DNS 97 Standard query 0x81d7 TXT i9MAAgADBA.dns2tcp.bitcoindev.network
   12   2.000392 192.168.88.167 → 198.211.119.30 DNS 253 Standard query 0x5a21 TXT i9MAAAAECPm+tNl2ZXJzaW9uAAAAAABkAAAANY1JMmLqAAABAAAAAAAAABGy0FA.AAAAAAQAAAAAAAAAAAAAAAAAAAAAA//8AAAAAAAAAAAAAAAAAAAAAAAAAAAAAAA.D//wAAAAAAADsus12M5hdlDy9TYXRvc2hpOjAu.dns2tcp.bitcoindev.network
   13   2.000393 192.168.88.167 → 198.211.119.30 DNS 97 Standard query 0xf992 TXT i9MAAAAFBA.dns2tcp.bitcoindev.network
   14   2.000445 192.168.88.167 → 198.211.119.30 DNS 107 Standard query 0x5ad3 TXT i9MAAAAGCDcuMi/APgMA.dns2tcp.bitcoindev.network
   15   2.000446 192.168.88.167 → 198.211.119.30 DNS 97 Standard query 0x17fa TXT i9MAAAAHBA.dns2tcp.bitcoindev.network
   17   2.084040 192.168.88.167 → 198.211.119.30 DNS 97 Standard query 0x709e TXT i9MAAwAIBA.dns2tcp.bitcoindev.network
   20   2.337630 192.168.88.167 → 198.211.119.30 DNS 97 Standard query 0xcf9f TXT i9MABAAJBA.dns2tcp.bitcoindev.network
   23   2.338287 192.168.88.167 → 198.211.119.30 DNS 97 Standard query 0x8bfd TXT i9MABQAKBA.dns2tcp.bitcoindev.network
   25   2.739867 192.168.88.167 → 198.211.119.30 DNS 97 Standard query 0xa220 TXT i9MABgALBA.dns2tcp.bitcoindev.network
   28   2.994641 192.168.88.167 → 198.211.119.30 DNS 97 Standard query 0x759b TXT i9MABwAMBA.dns2tcp.bitcoindev.network
   30   3.131211 192.168.88.167 → 198.211.119.30 DNS 97 Standard query 0x9047 TXT i9MACAANBA.dns2tcp.bitcoindev.network
   32   3.709438 192.168.88.167 → 198.211.119.30 DNS 97 Standard query 0x1525 TXT i9MACQAOBA.dns2tcp.bitcoindev.network
   34   3.824652 192.168.88.167 → 198.211.119.30 DNS 97 Standard query 0xac91 TXT i9MACgAPBA.dns2tcp.bitcoindev.network
   35   4.000888 192.168.88.167 → 198.211.119.30 DNS 97 Standard query 0x15cc TXT i9MACwAPAQ.dns2tcp.bitcoindev.network
Conclusion
In this tutorial we had a look at accessing our bitcoin node via a DNS tunnel using dns2tcp. There are various other ways in which you could achieve this, but we hope this inspires you to find and share them!

Comments